 So last week we created chipboard from scratch and this week I have had a request to show how I painted my chipboard like I did in my School Alpha & Tags.
But first, we need a winner! YEAH Rhonda, you are this week's winner! Send me an email at cileniac at yahoo dot com so I can find out your email and we can give you your $ credit in the shop.

Ok, movin on here to some good digi painting. ;)
So I have two tags I created with the exact settings and paper in our tutorial from last week. Didn't have time to create some to play with? No worries, you can download these chipboard tags here from me HERE along with a scratchy brush and a watercolor brush that we are going to use today. This way you don't miss out!
First let's just paint our chipboard with a solid paint. There are several ways you can do this. I won't go into my preferred method of layer masks and save that for another lesson so we don't loose and of our PSE buddies here. :)
Option 1
When you want the whole surface of the tag painted. (And maybe want to "scratch off or sand" the edges later for added interest and depth.)
Open your tags png file I gave you. Load the brushes I gave you in the zip file or use any kind of paint brush you'd like.

Create a new layer above your tags layer. Now while holding your alt/option key, click between the two layers so your blank layer is "clipped" to your tags layer. Your layers should look like I have here with the top layer indented. This tells your layer to only show the paint that is ON the tags element area to show.
Select your watercolor brush and the color(s) you want to use and start painting. If you want to keep your colors separate, just create more clipped layers above your tags and merge them together when you have it like you want.
 TIP: Remember you can size your brush up or down using your bracket [ ] keys and set your brush angle for your brush using the dial found in your brush panel. To see it, click on Brush Tip Shape at the top left. Then just rotate the circle dial at the bottom right. (Tip, you can even change the roundness here if you grab the dots instead of the arrow).
  Yes, it will look exactly like you clipped a watercolor paper to it (which works also by the way).
Now click E for your Eraser tool and select the scratchy brush I gave you and just touch around the edges while still on your "painted" layer. Sizing and rotating your brush as you work. I create brushes large for flexibility so you will need to size it down to work here.
I also double click (or 3 or 4 click), my brush some times in the exact same spot to "take off" a little more here or there as I work around until it looks like I want it too. It's all a personal preference of how much of the chipboard you want to show through. I also slide the brush across certain spots to "scrap" away even more paint on an edge. Think of this scratchy eraser as your sandpaper or sanding tool if you were doing this in real life but with no mess :D

Now this looks pretty good… but as many of you know, I want GREAT or the most real look I can get.
Zoomed in to about 270% here are some screen shots below of some different layer styles that can now be applied to your painted layer depending on the look you want.
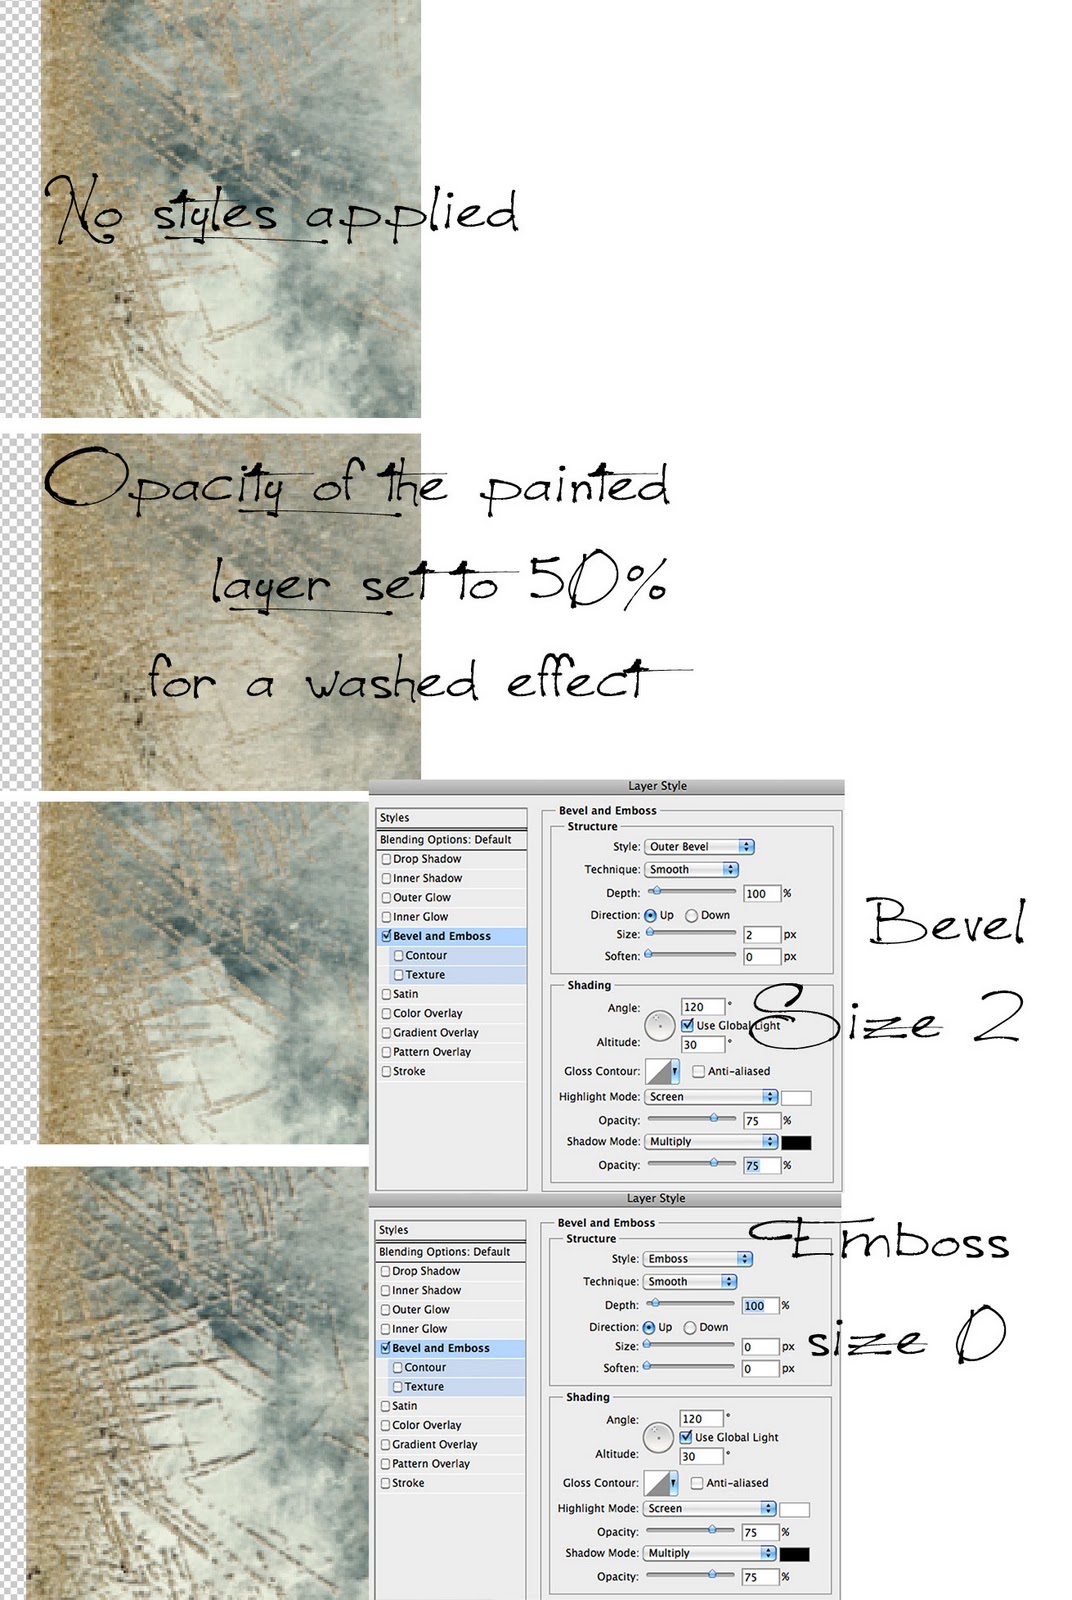
Play around with the different settings until you find what you like. And this will change too depending on what kind of brushes you use.
If you want a watercolor effect like it's seeped into the chipboard, lower opacity of paint.
If you want an oil type paint that's been sanded away, use the bevel style.
If you want it to look like you used a thick acrylic paint and scratched the painted away use the emboss style.
By no means are these your only choices. As I aways say, PLAY! Copy your layers and try all different effects and make a storyboard like I did above to show the end results for future reference. (Yes I really do have these reference sheets in my Scrap Companion! Nothing worse than playing and then trying to remember HOW you got those looks 6 months later!) I also save the PSD file right along with it and most of the time now I just create a style to use again and again. (also saved in this folder with these samples).
Option 2
This looks like you laid a stencil on top and painted inside the tags.
Open your tags png file. Load the brushes I gave you in the zip file or use any kind of paint brush you'd like.
Create a new layer above your tags layer.
cmd/cntl click on your tag's layer icon to select the shape of your tags.
Go to your menu file

You should see the marching ants inside your tags edge now like this.

Click B for your brush and select the watercolor brush.
Select the blank layer on top. Select the color you'd like to paint and start painting where you would like to have this painted. Sizing your brush with your bracket keys [ ] as you work and rotating the brush. When you have it how you want, cmd/cntl D to deselect your area.

Not bad :) And some will be happy with just this. It's a little transparent like real watercolors and lets the texture show through because I didn't cover it with the paint entirely and also the brush has some texture to it also.
But… yes, I want more. LOL
Same options as above in Option 1.
I used a combination of erasers using the scratchy brush AND the watercolor brush to show you the different effects.

Then I also applied my preferred style of emboss with a size of 2 and changed it to Chisel Soft.

This to me, looks like what my real life chipboard looks like after I have used a slightly watered acrylic paint, sanded and scratched lightly off. Has the touch of color I want but with the worn look I love. Just a touch of depth to my paint.
Now for the CS people, if you know how to use your layer masks, I suggest you use that on your painted layer instead of erasing. This way, if you don't like the amount of scratched off, you can add it back. ;)
Now get out your digi paints and erasers and get your hands dirty! Show us what you come up with and remember to play. Nothing is undoable, nothing will cost you money because we are doing it digi style! Think of all the chipboards we went through in the paper world to figure out the just right look we were after!
Have fun and don't forget to leave us a comment here or show us your stuff in the challenge gallery to be entered into next weeks drawing for a free kit $ credit.
Want a little peek at one of the new kits being released tomorrow? Oookaay… :D
It's called Within. Something I have had to do lately to get myself back on track!

Happy painting, Cilenia


Thank you for your freebies. Link on your post was added to PickleMouse freebie list