Related Posts Plugin for WordPress, Blogger...

Blog is Moving and first new post up!

Thursday, October 04, 2012
I've decided to move and merge my personal website and my blog.  Will be easier with everything in one spot for both you and me! :)

I've exported this entire blog to my new site so you won't miss a thing!  I plan on deleting this blog at the end of the year and hope you travel with me to my new home.

I plan on stepping back up my blog too!  Will be soooo much easier now!  I have lots of ideas for art, scrapbooking, art quilting and anything else I can get my messy little hands into. LOL

Some come and check it out.  Still evolving, but getting there. :D


And to start off the NEW Blog, I have an art journal challenge I lead and if you play along with me I have a free mini kit too!

Come on, I KNOW you all love a little freebie now and then. ;)

Free Lettering and Mark Making from Cloth.Paper.Scissors

Saturday, September 22, 2012
I purchase almost exclusively most of my Art Quilting and Mixed Media books and instructional Videos from Interweave. If you do also, please use my Affiliate/Sponsor link HERE or at the bottom of my left column here on blog.  These little pennies I earn from there I plan to use to supply Art Supplies to children whose parents just can't afford to buy.

BUT did you know they also have FREE eBooks too there?  This week, there is one on Lettering and Mark Making in Art 4.  I LOVED the ideas this gave me.  You can get yours too HERE on their site by signing up for their newsletter. (You can always opt out later if you want to but you may not want to either).  

This week the Freebie is from Cloth Paper Scissors!
Hand Lettering Tutorial: A Love Affair with Letters: Part OneProject 1: Hand Lettering Tutorial
A Love Affair with Letters: Part One by Sarah Anne DiNardo
There is something to be said about a handwritten letter, especially when creating a personal and unique item. For Sarah, text has been a constant source of exploration and inspiration. Armed with her creativity she has developed dozens of alphabets that now live in sketchbooks, patiently waiting to be used. In part one of this two part hand lettering tutorial, she covers all the basics. From finding you perfect pen, to what to start doodling on, you'll discover all you need to know to begin the process of hand lettering.


Hand Lettering Tutorial: A Love Affair with Letters: Part TwoProject 2: Hand Lettering Tutorial
A Love Affair with Letters: Part Two by Sarah Anne DiNardo
In the second part of this hand lettering tutorial, you'll learn how to find your style and begin creating your own hand lettering fonts. You dive into line, shape and texture of different hand lettering styles, as well as fun and interesting ways to practice and perfect.

Hand Painted Letters and Marks: Making Magic with MarkersProject 3: Hand Painted Letters and Marks
Making Magic with Markers: A Study in Color by Joanne Sharpe
Even as a professional artist, Joanne finds good old-fashioned coloring relaxing and artistically gratifying, especially with the right tools. In this tutorial, she introduces you to Copic markers and the benefits to adding coloring back into your life. She then walks you through a basic study in creating hand painted letters and coloring artfully using these materials. You are sure love her coloring tips and fun approach to mark making art!

Hand Lettering Styles: Graffiti LetteringProject 4: Hand Lettering Styles
Graffiti Lettering by Lisa Engelbrecht
If you live in or near a big city you've seen graffiti, though you can often find graffiti in many other places as well. But have you noticed the graffiti masterpieces popping up everywhere? Well mixed-media artist Lisa did, and she was inspired by their raw, artful expression. In a less mischievous manner, she began creating graffiti lettering on her art, and developed her own process for these lettering styles. In this hand lettering tutorial, she shares all her tips for graffiti lettering, even walking you step by step to creating your first piece of art.

Freebie and a "Name This" Contest

Friday, September 21, 2012
Did you get your coupon code for the Freebie I had in the Sept 19th Newsletter?  

This is the way I personally scrap a lot of the time, but never thought to create for my shop until a few of my Mates hit me on the head (a few times). LOL  I create these in my "Play Time" for layouts of my own or clients and now I want to offer the to you also!  Simplified of course as they take me many many layers to create. 

Tell me what you think of them? I love feedback!

I really don't even know what to call these yet! LOL  It's a frame, it's a transfer or Rub-On look AND it's a photo mask fused all into one great embellishment as a 2 layered PSD and also with the two layers broke out in PNG form for our non-Photoshop users.  Use them together or separately as artsy masks and overlays.  

SO, I'm going to ask you for help!  
What do you think I should call these?  If I use your idea, I will give you the first set of them FREE!
I will admit, I'm looking for something unique as a name, but also descriptive. :)

So leave me a comment here with your ideas to WIN!  No limit on the number of ideas or comments.  


In my layout here, I used a solid colored cardstock paper and a couple elements from my Follow Your Art 09 Growth.  I changed the layer blending mode of the frame to Overlay to it softly blended into the background paper so it looked like it was Transferred or Rubbed On like I would do in real life art.  Then I clipped my photo of my beautiful Kara to the photo mask layer.

I took the original photo again,flipped horizontally, extracted her out easily using my magic wand Quick Selection Tool and masked out the background.  Doing this allowed me to zoom in and clean up any edges.  I prefer using masks instead of erasing in case I make a mistake.  
Then I changed the large extracted photo to a blending mode Luminosity and lowered it's Opacity to blend a soft image of her also into the background paper.  By Repeating the photo I've really shown off what I love most about this layout… my Kara.  

I will do my journaling with some more photos for the opposite page of this in my book. :)  The title work was perfect for this moment.  She was getting ready and practicing for her Dance recital watching herself in reflection of the TV screen and she thought no one was watching. :)  I created the title with 2 fonts and played with the type character settings and plucked the color from the flower element to make the whole page come together. I think this entire layout took me 15 minutes using my new frame/mask transfer embelly. :)  

Credits:  Follow Your Art 09 Growth Fonts: Justice and Delicious Cake by Jellyka

What to do when kicked off my compy… PLAY!

Friday, September 14, 2012
My daughter needed to use my computer for about an hour or so yesterday… so I grabbed my notebook and headed up to the Art Studio in my loft…. The studio is filled with all kinds of inspirations, colors, fabrics and paints… but I only have about an hour or so before I have other commitments I need to be doing… sooooo… here I sat, with this basket staring at me that Miss Bailey had obviously been rummaging around in and had buttons and silks out too.  (No idea what she did yet, I'm sure I'll find some sort of art piece she made somewhere in the near future.)


Chat LIVE with me tonight about my Colors Class

Wednesday, September 12, 2012
Hey there everyone!
Today is the day to come and chat live with me about my upcoming Building Colors Confidence class at ReneePearson.com on ReneeTV!  You can ask me questions about the class, get a little overview of what I will cover in the class, or just come to chat with me live and in person. :)

LIVE CHAT TODAY SEPT. 12th 9:00 PM EDT at ReneeTV HERE


This class teaches you how to start any art project by choosing your colors correctly.  But, I don't stop there, I also show you how to USE those colors with little clips into my process with the 2 bonus videos (PSE and CS) and also my entire process from scratch how I create a soft artsy background paper.  This class is a must for anyone who want to become or even already is a Digital Designer too!  

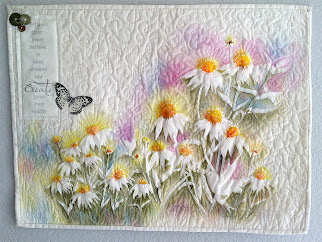
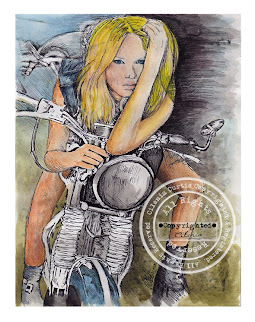
So no matter if you are a real life artist and want to produce these kinds of colors


Or you are a digital artist and want to produce this

This class will help you get there!  It's the first in a series of classes I am teaching that starts you from SCRATCH for on your way to becoming a digital artist and designer.  I don't teach how to use CU, or how to use someone else's color theme cards, I teach you how to develop and create your OWN!

Be YOU… Be UNIQUE… Be TRUE

Here is a small sped up clip from one of the bonus videos your receive in the class where I show how I created an artsy page, from scratch, with only a flower sketch and a photo of my tile floor.  
Start to finish, I show it all!


And if you want to see some more of my artsy style, I did an Evolution of a Page video at my Scrap Art Studio site's blog yesterday for Technique Tuesday showing my entire thought process on creating an artsy layout page.  This is in the raw, so be prepared. :)  No editing, saying all my thoughts, showing my entire process. :) 

And speaking of colors
Color Play 2 has been released in the SAS shop today! 
I LOVED working with these colors.  I created the color scheme from left over fabrics and silks!
From this

To produce this

All my Color Play 2 Kits are on sale right now through Sunday
Buy the Bundle or buy only the Mini Kits you like, and even a couple templates and quick pages.  
I even have the Solids (free with any purchase over $1 code is on the product page) and a Mini Sampler kit I gave away in our Newsletter today! 

See all the awesome Color Play 2 kits from ALL the SAS Designers.

 
© Cilenia Curtis 1986 - 2012 | Infinite Dimensions | The CAD Wizards
All content is copyright protected and owned by Cilenia Curtis. For permission to use any contents from these pages, please email Cileniac at yahoo dot com.