Related Posts Plugin for WordPress, Blogger...
Showing posts with label Art Play. Show all posts

LO for my daughter on finding STRENGTH with New art

Tuesday, May 01, 2012
Hi everyone!
I know I've been ultra quiet these past few weeks.  Sorry!  We've had some rough times here in our family along with my first of two upper jaw surgeries, but I'm happy to report that all is well now and like everything else difficult in life, this too has passed.  We grieved, we supported each other, we got STRONGER!

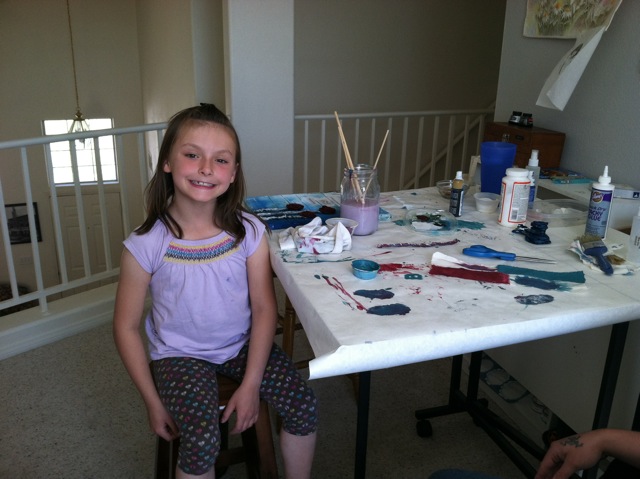
The timing of all this was uncanny... as I had already been working on our newest FYA collab Strength.  This kit hit home with me and my daughter Kallie as I was creating.  I will not go into details, as I am not one to put personal emotions out there, but I will say... I found the strength somehow to be strong for her and I was in awe of her own inner strength she found in herself.  

I do what to thank all of those who sent all the beautiful and positive thoughts and sentiments! It was very heart warming and the love was definitely felt from all. 

I created a layout to remind her and I of how strong we really are and how strong she can be... but also how much strength we can find and give to each other in times of sorrow or weakness. This is my Kal... I love her bunches and am so proud of the woman she has become today!


Credits: FYA Strength kits by Angie Young and Cilenia Curtis both found here.  Aria has a wonderful kit too that coordinates with ours. 
You can read the beautiful muse Aria wrote on our Follow Your Art Blog posted today and see some awesome inspirational layouts from our team.  There's even more in our Follow Your Art Challenge Gallery too. 

The Bundles on sale - Or you can find the pieces separately also if you prefer.
  

And this week Digitals is celebrating iNSD and my entire shop is on sale now through May 8th! 

I also released 2 kits, Brushes and Overlays, last week and they are all on sale too.  These are Personal and Commercial Use kits.  I rarely create Commercial Use, but these were just screaming to be shared.  I'd love to see what you create with them, so don't be shy, link me up!


Big hugs!


From my Sketchbook - Shadow Play and LO inspirations

Friday, April 20, 2012
Playing with light and shadows this past week with just a touch of color.

I lightly sketched it in an HB pencil and then sketched over that with my 03 and 05 Pigma pens.

Using my Inktense blocks Dewent I got from Blick Art Materials, I began to fill in her dress and then inked in some old looking plaster walls with the aged brick even. I decided on my light source which I imagined coming from the back left and just barely higher than my little french girl who appears to be hugging against the wall in a sort of deep contemplating thoughts. I casted my shadow from her body onto the wall.
Added a few details in with my ink pen and a little vintage looking color I though worked well.

Like my original ink art?
Did you know I sell prints at my Etsy Shop now by request? They are signed, numbered and come with a certificate of authenticity.

 Or you can contact me directly or for quote on canvas prints.
Originals are not for sale at this time, but thank you to those who have asked. :)

I also create custom ink art from your photos.  Contact me for a quote.

Looking for some inspirations?  
Here are just a few awesome layouts from my Designer's Gallery this week.

Credits: Layout by Beth aka mystampin

Credits: Layout by Judy aka judyinsd
FYA Hope Bundle  Clock from Blue Winter

Credits: Layout by me 
Follow Your Art Explore Kits by me and Angie Young
Angie Young's Spats Set 1 and Set 2


It doesn't stay clean very long! Playing in the Studio.

Sunday, April 01, 2012

The Art /Sewing Studio back in the loft finally! YEA!  Had to close the shutters to take the photo! lol Bright light! But perfect for doing artwork.


Sorry, the bright sunlight drowned out my windows.. I have my antique blue and rose bottles up there and they looked so sweet too.


Within minutes…..
"I'M READY NANA!  See... I have my Tim Holtz apron on even!"


So we thought we'd do some canvas art today.
We were inspired by Donna Downey's latest March's Canvas Create project.  Yes I'm a member and subscribe and LOVE IT!  I don't like pom poms so we made our own rolled fabric flowers instead.

We ripped our strips of fabric to about 1 1/2" wide.  I WISH I had Baileys Mama taking a video of this… she giggled so hard doing this ripping she almost fell off the stool! LOL
We used Mod Podge to 'glue' our fabric to our our canvas in strips and wrapped the ends around to the back.
Then began our color mixing with a blue and green and added just a touch of black to get a deep teal shade.  We dry brushed the whole piece putting a little heavier coat around edges making sure we stoked up and down to catch the torn fabric edges.  Hind site… I almost wish we had not glued the fabric so well and left a little more of the edges loose.  Next one. ;)  We also added some spray dye to our colors to brighten up the teal-blue we liked and used it directly too as we worked.   Home made spray dye from powered Rit Dye very strong.


We rolled fabric roses and made stems from old book pages for our canvas too and tacky glued them down to the canvas.  We did paint on the fabric roses with some of the deep red paint we had so it matched perfectly.  Just spray the fabric rose with a little water before brushing on the paint to make it soak into the fabric.
Then we just started to paint and platter and plat colors!  We added the deep red to match our flowers with some drippage on the top corner.  We like drippage! LOL (as Bailey giggles again as we do.)

 We printed one of my fav quotes and Miss Bailey cut that up into strips and glued down again using Mod Podge with a light coating over it so it had a film in case we wanted to wipe any paint off of while we worked.  The paper was a little to white for our liking so we added some white washing around the strips to blend it in better and even did a light wash of color over the strips of paper too.  Perfect in our opinion.  Then we plattered (thank goodness the table was covered in craft paper and we had on aprons! LOL But the craft paper splatters will be added to later and cut up and used in another project I'm sure.

This is my Miss Bailey being so happy we finally got to play in paints again!  She of course had to use up all the mixed paint when we were done with our canvas.  See the fabric strips in front of scissors?  Into the scrap bin they go for another project I'm sure. :)


So this is what we made today. :)  Need to take a better photo with a flash. :) The red in the roses is not as dark as this appears.  "Hmmmm maybe those flower need a button in the middle?" says Miss Bailey.  Kid after my own heart. :)  Love buttons!
Should be completely dry and ready to hang when she comes back over tomorrow. :D


Weekend Playtime with inks

Monday, February 13, 2012
So I have officially designated Sunday mornings to PLAYTIME in the Studio!  This is when I will play in the art studio just for me!  Currently I am working on a canvas filled with black and deep red poppies... will post when done... but OBVIOUSLY I was severely lacking art playtime this past week with all the busyness and found myself watching my recordings of The Voice last night and my "Go To" Box yelling at me how neglected it was feeling this week.  Yes, that little bugger jumped right up on the coffee table and scolded my butt! LOL 

SO... Since I am heavily influenced by Christina Aguilera and her Burlesque CD (LOVE that movie and her with Cher and all the music...  so upbeat and gets me pumping when I power walk but I just adore her and her attitude along with Cher!)  I know…totally different worlds there especially coming from an 80's big hair band and southern rock lover, but still the same somehow.  ok, so I'm eclectic! lol

 I digress…  

ANYWAYS....  I wanted to do something a little edgy for a change instead of my usual softly colored botanicals I've been doing lately… guess that's why the black and red poppies are coming out in the studio too! lol   So I grabbed my watercolor pad, my ink pen and sharpie marker and went to town!  Then I used my Inktense blocks and watercolored it. :)  Can you also tell I REALLY wanted to take a ride past few days with the temps in the 70s! LOL
So what do I call it?  Ready to Ride! of course! lol  Expresses my deep desire to go for a ride lately and tired of waiting to find the time to do so!  Where are the boys when you need them to drag your butt away from work and out into the sunshine for a bit?!

Nothing spectacular... just playin!


Playing with Fabrics and my Go To art box

Tuesday, February 07, 2012
What have I been up to lately?
Someone emailed me the other day asking me what is in my "Go to" supplies box so thought this was something to show you today. Yes… I've corrupted another poor soul into mixed media. lol Sorry Janet!  But you're gonna love it! Just PLAY!

This box was just screaming at me to play with Sunday!
I keep this in my Living room with my most loved supplies so if I'm sitting and watching TV I can grab paper or fabric and play. :)  No, I can't just sit and watch TV and do nothing else. lol  Why waste the time? :D I'm usually found watching my Quilting Arts TV recording Sunday afternoons.

  The box is one of the magnetic closing types from Michaels Craft Store that I proudly got a whole set of assorted sizes on sale for 40% off AND I had a coupon for 20% off my entire order. Gotta love it!   Just close it up and keep it on my book shelf in there.  Looks all neat and pretty when closed up with it's vintage collage covering.  Miss Bailey has one too! :)

Supplies in the box?  Watercolor paper pad, usually a few pieces of canvas or muslin scraps, masking tape, Derwent Intense Blocks, Water Soluble Wax Pastels, 6 of my fav Pan Pastels, gum eraser, pencil and sharpener, 2 water brushes, small gesso paint and brush, spray bottle with water, assorted ink pens and markers (3 Pigma Micron Pens sizes 01, 03 & 08), Piolet Parallel pen 1.5mm, a black Stained Sharpie, black regular sharpie, white acrylic paint pen, assorted foam sponges, plastic mixing cups (recycled from dipping cups from fast food restaurant), 3 mini misters and several Tim Holtz Adirondac Alcohol inks and 3 silk squeeze bottles with needle tips and filled with acrylic paint in them for sketching outlines. All from Dick Blick's Art Materials.


What to do… what to do….
Always could use some more flowers! Where the heck is spring anyways this year? 
Yes, I'm spoiled, usually planting by now. 
 So I sketched some out using my Sharpie Pen on a piece of scrap muslin.

Added background color and flower centers with Pan Pastels using my foam sponges.
These are a newer item in my box lately as a gift from a dear friend… really wanted to play with them and color blending.
See Lynne!  I'm using them! LOVE THEM! Smoooooch!
Lynne is also one of my fellow designers, Aria, in the Follow Your Art series 
in case you haven't connected those dots!  

Added more details using my black ink Pigma Pen 
Can't decide if I'm done with it yet. Stay tuned. :)

Do you play with your art too?  Link me up in the comments here!  Would love to see what you're up to also!
 
© Cilenia Curtis 1986 - 2012 | Infinite Dimensions | The CAD Wizards
All content is copyright protected and owned by Cilenia Curtis. For permission to use any contents from these pages, please email Cileniac at yahoo dot com.