Sorry I was a little late today… it's all Veevs fault! LOL We were playing in Skype and she was showing me her Art Rage program and all the KEWL things she can do with it. (Guess what I'm doing as soon as I'm done here?!? Yep, going to get me that program! LOL) Just love how we could talk on there and screen share! Still learning the Skype thing, but I had a good teacher ;) Thanks Veevs!
LOVED seeing all the pretty papers everyone created last week from the paper border tutorial! WOW, you girls ROCKED!
 And this weeks winner from all the comments and gallery entries is…. (hear the drum rolling?)
PAULA! YEAH! Paula, email me so I can get you some store credit to get you your kit. cileniac at yahoo dot com.
SO, how does mine look so real? Because it's a real scan of a real paper! Let's talk about that first.
Chipboard is brown papers all cut up and compressed into a board. Paper bags are brown papers all cut up and compressed into a paper. The only difference is the thickness and texture. And we want good texture!
Here's how I did it. I took a brown paper grocery bag, wet it down really good, but not so much it will fall apart. I gently scrunched it all up and then laid out flat to dry. Wetting it brings out the grain of the paper and raises it. Just like wood would… well, after all paper is wood!
After it dries, I scan it in a high quality like I would a photo.
This actually has now become two tools to use in designing. First I can use it as an overlay for texture. I could even up the levels and contrast of it and save as a PSD file for using in my Filter>Texturizer tool. And now I can use it as a pattern in my Fx Styles… which is what we will use it for today.
Just out of curiosity, I did a search on my compy for "chipboard". I've collected a lot of kits and freebies in my time before I started designing. Still buy some today from my FAV designers too, but rarely do I pick up a freebie from someone other than my favorite designers today. But I was really amazed how little came up in this search that even looked CLOSE to real chipboard! Believe it or not, here was the best from all the pics I have.
Here's a screen shot at about 60% zoom level.

NOW… I'm NOT putting anyone down here so please don't think that… cause for a long time I didn't know how to make chipboard look like real chipboard either! You just don't know what you don't know! LOL But it was one of my pet peeves to get it to look real! If you know me, you know that I try to always mimic real life in my digi art. I want it too look real darn it! And although I'm biased, I think I achieved pretty darn close.
Two of these in this pic are from my own kits… can you guess which two?
Only one of these have I purchased in a kit. Most of these do not look anything like chipboard in real life. But maybe that's what the designer was trying to achieve. Let's get a little more up close and personal with these… how about 400%?

Here is where we start to see the differences IN DEPTH! That foot now looks more like a plastic puffy type. The blue piece looks like a blurred paper with a bevel as does the star.
Which looks the most real to you? Which would you want to use and call it chipboard?
If you are like me… then it's the heart in the bottom right corner… that's what looks most real to me even zoomed in this close. That's the look we are after here.
So we would open our file of scanned paper and and create a pattern with it. If you have a high quality craft paper you can use that too.
Go to your top menu EDIT/DEFINE PATTERN Now your pattern is loaded into your patterns at the very bottom.
Let's start with a simple shape… any shape you have will do or just draw a circle or square.
Double click your layer to open your layer styles.
Check Pattern Overlay and go to that dialog window.
Click on the pattern and scroll to the bottom and choose the pattern you just saved.

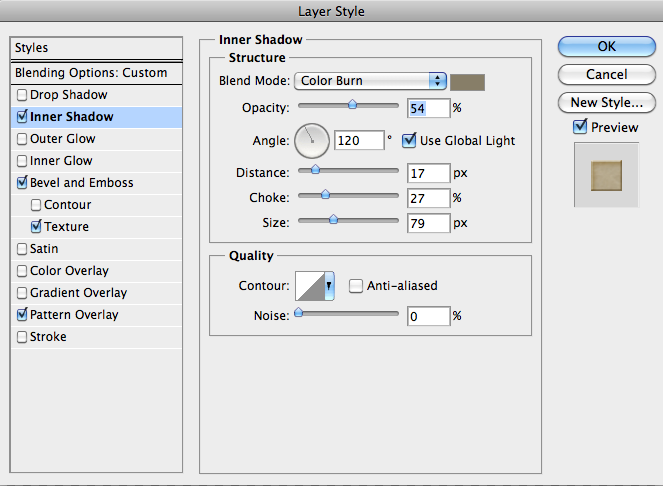
Next click on Inner Shadow. Use these settings here for now. You can play with them later if you like.
For the color, I use my eye dropper on the darkest spot on my paper I used and then then pick a darker area within the color picker area so I have the same hue. I also use color burn or linear burn for the blend mode.
Check your Bevel and Emboss and again, use these settings for now. Can always play later to tweak it the way you like. It's the base starting point we are trying to get to.

Now check Texture. Highlight it and click on the pattern and load the photoshop standard Grayscale papers and choose the one that says Homemade paper. You can try the others in this set for very different textured looks also.
Click ok.
There you have it, your basic chipboard! :)
One last thing… so you don't have to repeat this over and over. Save your style!
Double click the layer again to bring up the styles dialog box.
click on New Style. Make sure both boxes are checked for Include Layer Effects and Include Layer Blending options. Give it a name… ummm like Chipboard :) click ok. Click ok again in the main dialog box. Now you should see this new style by you in your styles menu. :)

Now you can apply this style to ANYTHING! Granted, not everything is suited for chipboard, but it's fun to play and try it on different things like text, shapes, swirls and on and on. And be sure and go back and play a little with the settings to get it just they way you like it.
I usually apply this style and then tweak it from there for exactly what I'm looking for.
Here's a simple photoshop shape with the style applied. Then I added a drop shadow, toned done the opacity for the Highlights on the bevel shading. Looks pretty darn close to real chipboard to me. :)

And pay attention to tomorrow's Newsletter and Freebie post in the forum because I'm going to give you the kewl scanned paper I use to make this style.
Next week maybe we will "paint" our chipboard to make it look like real paint with some scratched edges too. We'll see! :D
And be sure to comment to be entered into this weeks free kit contest! And don't forget to show us your kewl creations in the challenge gallery because I'd love to see them.
Till then, have a great week!
Cilenia


Wonderful tutorial! I love chipboard and can't wait to try this out. Thank-you!